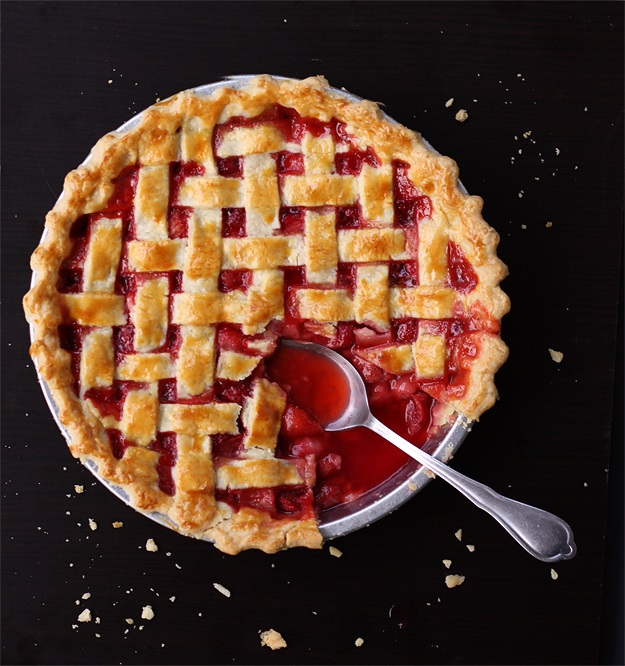
While hot, the filling is still runny. When cooled, it thickens up. (But I din’t want to wait for hours…)
This pie is a real summer-dessert, begging for a scoop of vanilla ice cream on top. It’s a fruity American classic with a decent buttery pie crust. The recipe worked right away the first time I’ve tried it and I have made it a couple of times since. It’s delicious but requires some time and effort – you and everyone around will be rewarded though.
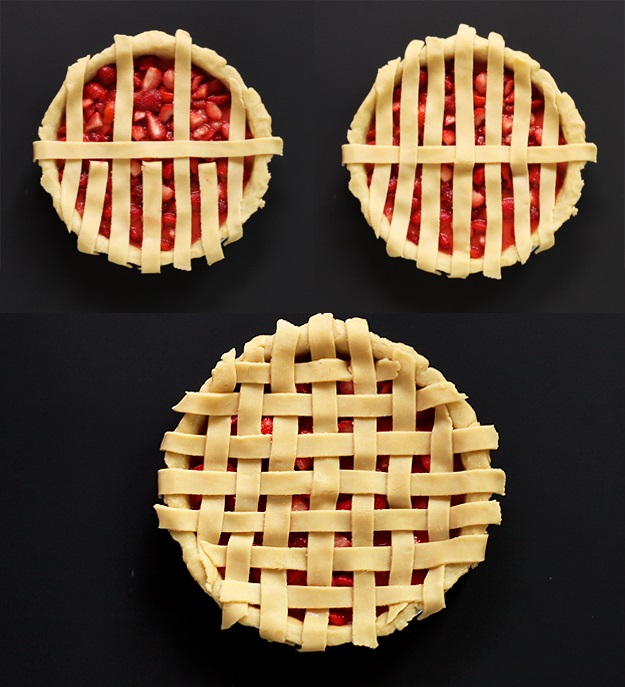
Picture 1: Lay half the strips evenly spaced atop of the pie and fold every other strip back on itself. Lay one of the remaining strips vertically over the pie.
Picture 2: Unfold the folded horizontal strips so they lay over the vertical strip, then fold back the other strips.
Picture 3: Repeat the process until the pie is completely latticed.
I always thought it’s pretty time-consuming making a lattice but actually, it wasn’t that bad. Just make sure to lay one half of the strips over the pie, then fold back every other strip, let’s say number 2, 4 and 6, as shown in the image above. Now place a strip vertically over the pie and unfold the folded horizontal strips. Now fold back strips number 1, 3, 5 and 7, place another vertical strip and unfold. Continue this procedure until the lattice is completed. That’s quite simple, isn’t it?
Also, in addition there are some really good webseits and videos around that show how to crimp edges decoratively or how to build your own pie shield. The latter comes in handy to protect the crust edge from overbaking and becoming too cripsy and brown.


Ingredients
- 1 ½ sticks of unsalted butter, chilled (6.3 oz/180 g)
- 2 ½ cups unbleached all purpose flour (10.6 oz/300 g)
- ½ teaspoon salt
- 2 ½ tablespoons granulated sugar
- 5-6 tablespoons chilled water
- 1 egg white for brushing the pie
- 4-5 cups strawberries, washed, dried and hulled (25-29 oz/700-800 g)
- ½ cup granulated sugar
- 3 tablespoons corn starch (1 oz/30 g)
- ¾ tablespoon lime juice
Instructions
- Cut butter in small cubes and set aside in the freezer to keep cold. Meanwhile prepare the rest of the ingredients.
- Process flour, salt, sugar and chilled butter together in a food processor until mixture resembles coarse crumbs.
- Then mix the ice cold water into the dough, 1 tablespoon at a time until pastry just comes together. If using a food processor for this step, be careful not to overmix; the dough shouldn’t form a ball in the food processor. To avoid overmixing, it is best to use a spoon to incorporate the liquid.
- Turn pastry onto a lightly floured surface and knead for a few seconds.
- Divide the dough into 2 parts, one slightly larger than the other, and shape into 7" discs; wrap and refrigerate for 1 hour (or up to 3 days) before rolling . Meanwhile prepare the filling.
- Cut washed, hulled and dried (!) strawberries into quarters.
- Combine sugar and corn starch. In a separate bowl mix berries and lime juice. Do not mix berries and sugar until ready to bake, because the sugar will dissolve when added to the strawberries making the filling very runny when resting too long.
- Prepare the bottom half of the crust first: Roll the larger disc out in a 12" to 13" circle (about 1/8 inch thick) on a lightly floured surface or on parchment paper. To avoid the parchment paper from being slippery, isprinkle some water on the rolling surface before placing the parchment paper.
- Carefully fit the pastry circle into the bottom of a 9-inch pie plate. Snug it against the sides and corners of the pan and trim the edge leaving a ½-inch overhang.
- Put the pie pan back into the refrigerator.
- Preheat oven to 400 °F.
- Roll out the smaller disc into a 10” to 11” circle on a lightly floured surface. I do not recommend rolling the lattice dough out on parchment paper, because the dough can get wrinkly (which is ok for the bottom crust).
- Using a sharp knife, cut the crust into even strips roughly ¾-inch wide. I make the lattice with 14 strips, but 10 or 12 are also ok. Fewer strips give you a less tight lattice.
- Remove the pie pan with crust from the refrigerator and brush bottom and sides with egg white, mixed with 1 teaspoon of water. The egg white helps to avoid soggy pie crust.
- Mix strawberries and sugar just until combined and pour the filling into pastry-lined pan. Gently smooth the filling using a spoon for an even surface supporting the lattice.
- Lay half the strips evenly spaced atop of the pie, using the longer strips in the middle and shorter strips toward the edges. Space the strips a little apart.
- Fold every other strip back on itself. Lay one of the remaining strips vertically over the pie so that it lays across the unfolded horizontal strips.
- Unfold the folded horizontal strips so they lay over the vertical strip and fold back the underlying strips. Repeat the process until the pie is completely latticed.
- Trim the edges with scissors if needed. If you want to crimp the edges decoratively, you will need more overhang.
- Firmly seal the edges, using your fingers or a fork.
- Gently brush the top of the pie with remaining egg white-mixture (you can also use egg yolk or milk) and bake it for 45 minutes or until the crust is slightly browned on the middle rack (I use rack 2 of 4 from top) in the preheated (400 °F) oven.
- Let the pie cool down completely.
Notes
To prevent the edges from getting too crispy and brown, use a pie shield or make one yourself, using aluminum foil.
Did you follow this recipe? You could share your result here. All you need to do is take a picture with your smartphone and send it to [email protected]